Showing posts with label bead. Show all posts

Thursday, 5 May 2011

Making: Paper Beads


History of Paper Beads


Making paper beads is a traditional craft that goes back, in England at least, as far as the Victorian age. Young ladies would gather socially in their dining rooms, whilst making beads from scraps of wallpaper rolled on knitting needles. They would then polish the beads with bees wax and string them on to long pieces of yarn. They would then be used to make door curtains to divide rooms.

This practice was then revived in the 1920s and 30s for jewellery making.

More recently paper beads have been made in cooperatives as part of development projects in countries such as Uganda. This sees a move away from charitable aid towards business enterprises that provide sustainable income and development opportunities. The techniques used remains largely the same as used in Victorian times, but with recycled paper from printing companies and recycling markets, rather than wallpaper samples.

Paper beads are also made by independent bead making artists around the world and sold through their own web sites or online market places such as Etsy and Artfire.


Requirements


  • Paper – Magazine pages, wrapping paper, wallpaper, and coloured art paper, or more specialist papers such as handmade Japanese Washi or Chiyogami paper. 
  • Pencil – for marking up the paper. 
  • Ruler – for measuring up. 
  • Craft Knife, Rotary Cutter or Scissors – for cutting out. If you are using scissors you should use the longest pair available so as to reduce the number of cuts required along each length. 
  • Straight Edge – for cutting against. 
  • Self Healing Cutting Mat – for cutting on. 
  • Metal Skewer or Thin Wooden Dowel – for rolling paper against. Commercially made bead rollers are also available. 
  • Soft Paint Brush – for applying glue to the paper. 
  • Glue – for securing your rolled beads. Undiluted PVA is perfect but there are many other alternatives. 
  • Wooden Cocktail Sticks – for holding your rolled beads when drying or when varnishing. 
  • Soft Paint Brush – for applying varnish. A quality brush is preferable at this point as it is less likely to leave bristles on the surface of your beads.  
  • Varnish – for waterproofing your rolled beads. Quick drying marine varnish is perfect and is usually touch dry within 1 hour and ready for a second coat in 4 hours. Experiment with gloss, satin, matt, and antique finishes. 
  • Oasis Florist Block, Polystyrene Block, or similar – for securing the beads whilst varnishing and drying. Push a cocktail stick holding an individual bead securely into the block.

Basic Technique
  • Place your paper face down on your work surface so that the side facing you is not the side that will form the outside of the bead
  • With a sharp pencil mark up the reverse side of your paper sample by marking-up one short edge of your paper with divisions spaced 30mm apart. On the opposite short edge of your paper make a mark 15mm in from the edge and then continue with divisions 30mm apart. In this way you should have the makings of a long isosceles triangle when you join two adjacent marks on the first edge, points A and B, with the central mark on the opposing edge, point C.
  • Continue marking up the paper until you have the desired number of triangles to cut out. To simplify this step and to aid repetition you could make a template to draw around, or if the paper is of a suitable size use a computer, a graphics package, and a printer to print the layout on to the paper.
  • At this point it is worth noting that these measurements have been provided as a starting point, but ultimately it is the ratio of these measurements, combined with the overall length of the paper you are using plus the shapes that you use that will determine the dimensions and shape of your finished bead. Experiment!
  • Carefully cut out the triangles using scissors or for a more accurate cut use a straight edge and a craft knife or rotary cutter.
  • Take your skewer or dowel and starting at the wide end of your paper sample roll the paper around the skewer slightly so that it starts to form a cylinder. Once you are happy with the alignment roll this back and with a brush apply a little glue across the width of the paper immediately below the line of the skewer. Now carefully roll the paper past the glue and continue onwards ensuring that each spiral at the side of the bead is symmetrical as it forms.
  •  At intervals apply another line of glue to secure your work so far. This is far cleaner than covering the whole triangle in glue at the outset.

  • When you have approximately 3 cm remaining, cover this remainder with a thin coat of glue leaving a border around the edges. When rolling the glue will be forced over this border without squeezing out over the sides of your beads.
  • When the paper is completely rolled make sure the end is securely stuck down before rolling the bead through your fingers with a light pressure to ensure it is cylindrical and secure.
  • Slide the bead from the skewer or dowel and transfer it to a cocktail stick and set to one side in your florists block or polystyrene block to completely dry.
  • When you have a good number of beads prepared you should then brush each bead with a few coats of varnish to make them water resistant. Follow the manufacturer’s instructions, but ensure that when touch dry you rotate them on the cocktail stick so they don’t stick when fully dry. Several thin coats give a much more polished result than one thick coat.
Refinements to this Technique
  • To make beads with different shapes, vary the size and shape of the paper triangles that you cut. The following options are a guide but it is possible to add your own permutations:
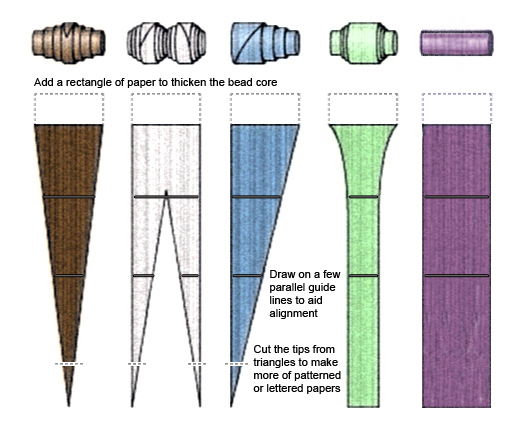
  • To provide a neater finish to your bead and to show more of the paper, simply cut the tip from the triangle as indicated in the diagram above. This will give a broader end to the last part of the roll. This is particularly effective if you are using patterned paper or paper with text, as it will show the detail of the pattern or lettering.
  • To provide a stronger, neater, flatter core to the finished bead add a rectangle of paper to the long base of the triangle as shown in the diagram above. This doesn’t need to be more than 1.5cm long, and should simply allow for a few turns of the paper around the skewer or dowel. It also makes initial alignment of the paper easier. It has the added bonus of making the beads sit better against each other when strung. On the downside, the initial stage of laying out the paper for cutting becomes more involved, but in the end it is worth the extra effort.
  • To monitor progress and to ensure ongoing symmetry it is worth while adding some parallel pencilled lines to the back of the paper at the marking up stage.
  • Once you have a set of finished beads experiment with finishes and embellishments to add extra interest – be it gilding, wire wrapping, adding fancy papers, using specialist glazes, or simply painting them, the options are endless.
Paper Sources

The main criterion for selecting paper comes down to weight. If the paper is too flimsy it is likely to tear whilst it is being rolled and if it is too heavy it will prove difficult to roll resulting in a loose and uneven bead. The only other issue is likely to be with finish. Before settling on a particular paper check that it will stick to itself with the glue that you are using and that any applied colour or print will not run when glue or vanish is applied to it. Otherwise, as you will see from the few examples provided below, the options are endless.


Art Paper
    A trip to a local art supplier will present you with a rainbow of artists’ papers all neatly stacked in a display cabinet and available by the sheet! Used for pastels, charcoals and pencil drawings most of these papers are also the perfect weight for paper beads. In addition to the range of colours many of these papers are also finely textured or grained, which will add a little something extra to the resulting bead. A name to look out for is Fabriano Tiziano. When compared with wrapping paper this is a far cheaper solution albeit minus the patterns.
    Copy Paper

    This paper is perfect for making solid colored beads. It comes in a wealth of different colours and because it is designed to go through a printer or copier it is the ideal paper to use with a template image. With a little work on a graphics package on a computer you can set up a template document, which will print out cut lines on each sheet, removing any need to measure prior to cutting! Another positive is that it is always likely to be in stock should you want to do a re-run of a particular set of beads in the future.

    Specialist Paper
      For that really special bead, or a paper bead embellishment, there is nothing finer than using a specialist paper be it Japanese Chiyogami, Italian Fiorentine, or French marbled. These are the preserve of fine paper and book binding suppliers.
      Junk Mail


      These largely unwanted additions to newspapers and letters can be used in much the same way as magazines. A better end for them than the bin!

      Magazine Pages


      This is a great way to recycle old magazines and the resulting colour combinations achievable are endless. When selecting pages remember it is the edges of the strips that will be visible on the finished bead as well as the end of the roll. Unless you are using paper from the large format magazine, typically fashion related titles, it may be worthwhile opening the staples on the magazine and using a double page spread.

      Newspaper Pages


      The weight and composition of newspaper means it is best used for tapered beads. On the plus side most modern newspapers use colour fast inks but it is worth checking how it works with the glue and varnish that you will be using. A second benefit of newspapers is the width of the sheets particularly if you make use of the Sunday broadsheets.

      Paper Shopping Bags

      Whether plain or printed this paper makes for really good beads. Plain brown paper provides a wood-like appearance when varnished, which can be enhanced by selecting antique effect varnishes. Printed brown paper bags tend to have pleasant earthy tones, which again give a vintage feel to the resulting beads.
      Parcel Paper

      Like the plain brown paper bags this paper gives a lovely wood-like finish once varnished and is a nice weight to work with. Plus there are more colour options available than previously.

      Wrapping Paper


      Wrapping paper is an ideal medium simply because of the breadth of colours and patterns available. However the heavier better quality papers can be expensive and unfortunately it is these that are less likely to tear when damped or lose print when handled.


      Warning:

      Having been varnished paper beads will survive a rain shower but they don’t like to go swimming or to do the washing up!

      Paper beading is highly addictive!


      Our Social Media Links:


      Pin It

      Wednesday, 9 March 2011

      Vintage: Oriental Beads with a Story to Tell

      We love learning the history of the beads that we unearth for the site. Some beads are discreet about their origins, some simply refuse to give any information away despite the use of arm-twisting, and others with a little encouragement sit down and starting chatting until the light fades from the sky. We had the pleasure of meeting some of the latter beads recently and they are now on Big Bead Little Bead for your perusal and maybe one or two will be able to add their tales to your own.

      We first met our friends through the wonderful world wide web and that well-known internet auction site. They were for sale as a job-lot, pictured in a rather nice wooden cigar box, but unfortunately photographed really badly so that it was very difficult to see any detail on the beads. We liked the look of the cigar box, and we judged that one or two of the beads looked like carved wood and worth a closer inspection, so we took a chance and placed a bid. Sadly they arrived independent of their handsome display case, but upon opening the envelope all was forgiven, for we had landed a stash of really unusual lacquered beads, along with some glass and agate / carnelian.


      The lacquered beads immediately introduced themselves as hailing from the Far East, so we contacted the vendor to see if he could let us know any more information about their origin. This was when the beads stopped talking. They were part of the vendor’s late mother’s effects, and she was, by his account, a magpie. We got the impression that she was a frequenter of church fairs and charity shops rather than a lady of means who spoiled herself at Christies every once in a while. We also asked the vendor whether his mother or family had any connection with Japan or China, but again the trail went cold with a negative answer.

      Our next step, and hooray once again for the internet, was to go online and get Googling.

      Eventually after a lot of sleuthing and inputting tangential keywords the trail picked up, as did our hopes, as we came across these beads on Christie’s Auction House website. At least two of the beads shown were close matches to some of our newly arrived beads, with the same lacquered surface, the same colouring, and the same style of surface decoration with tiny seed pearl embellishments. The Christie’s beads had been identified as Ojime, so our next question was . . . 


      What are Ojime?

      You may well have heard of their better known brothers, Netsuke. Both ojime and netsuke were decorative and functional parts of the Japanese Inro, a small solid container that functioned as a pocket or purse, and hung from the waist sash of the kimono. Originally inro were used mainly for carrying herbs and medicines or seals. They were a solution to the fact that kimonos had no pockets, but became an excuse also to display wealth, aesthetic appreciation and craftsmanship as wealthy samurai commissioned inro from talented workers in wood, lacquer, ivory and metal. The inro consisted of separate stacking parts, held together by cords. The cords ended with a netsuke, that was used to anchor the inro as it was suspended from the waist (see the image below showing an inro from the Victoria & Albert Museum, London).


      The ojime is the bead that the cords ran through (the skull bead in the example shown above and labelled in the illustration below). It functioned as a way of closing the inro, holding all the component parts together. Ojime of the type auctioned by Christie’s had a brass tube at their core to allow the smooth running of the cords. Many of our beads also had a brass tube within their hole.


      To try and get confirmation that we had in our possession a stash of ojime we contacted various groups of collectors and individuals - again we found their details online - and we were more than pleasantly surprised how quickly we received responses and how generous people were with their expertise, including Frederick Chavez, a respected collector and expert in this field. From the information we were given all of the beads were thought to originate from Japan. However it was possible that they were made for the western market and for decorative use only, rather than being functional beads used on an inro. One expert mentioned that Liberty's sold strings of beads of exactly this type, as illustrated in their catalogues from the 1900s to the 1920s. The strings were worn as necklaces and also were known to have been used to weight the four corners of a black silk tablecloth placed on a bridge table (hung from silk tassels). Sadly, they are not quite as valuable as the high-end, hand-crafted beads on the Christie's site. However, less valuable does not mean less interesting, and it at least means more affordable!

      The first four beads shown are all lacquered. Multiple layers of coloured lacquer were applied and then facets were taken from the curve of the bead to reveal the layers beneath and thereby creating bull's eye patterns.


      These beads were also produced by cutting into layers of different coloured lacquer. This time a geometric pattern segments the two halves of the bead. 


      This bead has tiny insertions/inlays of abalone shell amongst the patterning created by the layers of lacquer.


      More lacquered beads with hand-carved motifs.


      The following beads are made from a resin or early plastic and were made in a mould. The seam line is just visible if you look hard. The tiny pearls are most likely to be small beads of glass. The design is that of small flowers within curving lines representative of the movement of the wind/flow of water.


      These are also resin/plastic and moulded. The motif on these is a dragon that undulates around the bead, tongue flicking and tail swirling. 


      This set of three beads are wooden with stamped and drilled decoration.


      The next two beads are thought to be wooden with a coating of gold lacquer and inlays of abalone shell.


      The following beads were part of the same collection, and are also thought to be Japanese in origin and again from the 1900s to 1920s, but are obviously quite different in appearance. The first pair, at first glance, look like they might be made of bone or hone in imitation of ivory. It was suggested to us that they might be made of marine ivory, or that these too have been made from casein or some other form of plastic. From a close look at them it is still very difficult to come to a conclusion other than we are pretty definite they are not bone as they are too weighty.


      More straightforward are these lampworked beads, made by wrapping molten glass around a mandrel. Both colourways include a ribbon of aventurine (glass with fine particles of copper).


      So the beads told their tales to us, and from listening to both collectors and traders it is very likely our ojime were produced in the first couple of decades of the 20th century for the Western market. Trade with Japan only truly opened up during the latter part of the 19th century, but the novelty (and beauty) of the goods that were traded engendered great interest in all things Japanese and the high-quality of craftsmanship exhibited led the fashion for Japonaiserie to be integral to both the Arts and Crafts and the Art Nouveau aesthetic within England. The Liberty's store in London was a key source for the fashionable rich to go to purchase the dernier mot in Arts and Crafts and antique furnishings, and therefore the perfect stockist for strings of ojime style beads for the Japanoiserie enthusiast. I would love to see a copy of their catalogues from the first decades of the 19th century to see the beads listed - a trip to the British Library to the V&A might be on the cards.


      To see incredibly beautiful, intricate hand-carved authentic ojime, have a drool over the antique netsuke and ojime on this site, and also the ojime bead necklace sold through Sotheby's.


      To buy any of the beads featured in this post, please head to www.bigbeadlittlebead.com


      Our Social Media Links:


      Pin It

      History: Wound Glass Beads

      The earliest bead making civilisations produced beads using the wound method, indeed it is one of the first ways in which glass beads were made. Ancient cultures, such as the Egyptians, heated a crucible of glass into which they dipped a mandrel. This technique is sometimes referred to as furnace winding, because the glass was first heated in a furnace. To form the shape of the bead the mandrel was rotated to allow the molten glass to move and create a rounded shape. The bead could be shaped whilst still on the mandrel (i.e. using tools to create a shape other than a sphere – for example a cylinder - is known as ‘marvering’), it could also be decorated with the addition of other glass applied to the surface of the bead.

      Lamp winding (most modern lampwork beads are based on this method) is a more contemporary technique.

      A cane of glass is heated in the flame of a small hand held /table mounted lamp. The glass is wound around a mandrel as before, but there is more control allowing for more ornate or complex decoration. Generally, this method was not used much before 1750 (at least by the Venetians). The beautiful contemporary black lampworked glass bead above was made by hand and flame by Studio Marcy.

      Of beads produced today, furnace wound beads often originate from India. They are cheap to make, as they can be made from glass scraps, and they are relatively quick to produce. The grouping below are all Indian made lampwork or furnace glass beads - they are large in scale, ranging from 20mm to 40mm hole-to-hole length with hole diameters of 3-4mm. The beads have been shaped by hand tools rather then moulded.


      The mandrel used for furnace wound beads is generally an iron rod, because iron loses its heat faster than the glass allowing the bead to be removed from the rod. The oxidised iron leaves a deposit of iron oxide on the inside of the bead hole. Lamp wound beads also exhibit a deposit, usually a white residue, within their hole, the result of the ‘release’ applied to the mandrel to allow the bead to be easily removed from the metal rod. The bead shown below is a Japanese Cherry Brand lampworked bead from post-war Japan. The basic wound glass lampworked core has been shaped with metal snips. The hole opening shows the remains of the white coloured release used.

      Murano bead makers use copper mandrels that they remove from their beads by means of an acid bath – hence, one way you can determine whether a bead is genuinely of Venetian origin is to look for a clean hole, for this method of removing the mandrel from the bead leaves no trace on the bead.


      Our Social Media Links:


      Pin It